Overview

To authenticate with SAP SuccessFactors, you need:

  1. API Server - The base URL of your SAP SuccessFactors OData API instance.
  2. Company ID - Your company’s unique identifier in SAP SuccessFactors.
  3. API Key - The API Key generated during the OAuth client application registration process in SAP SuccessFactors.
  4. SAML Assertion -A Base64-encoded XML document that contains security statements about a subject (typically a user). It is digitally signed using the private key associated with an X.509 certificate to ensure authenticity and integrity.

This guide will walk you through obtaining these credentials within SAP SuccessFactors.

Prerequisites:

  • You must have an account with SAP SuccessFactors.

Instructions:

Step 1: Finding your API Server

  1. Please visit the following API Server URLs
  2. In the listed API Server URLs, search for the environment that matches your subdomain.
  • For example, if your domain was https://salesdemo4.successfactors.com, search for salesdemo4.

Step 2: Finding your Company ID

  1. Login to your SAP SuccessFactors account. Go to the upper right hand side and click on your profile image to view your username.
  1. To find your SAP SuccessFactors Company ID, in the same dropdown menu, click Show version information. Locate Company ID in the modal that pops up:

Step 3: Generating your API Key

  1. In your Admin Center, go to Tools, and search Manage OAuth2 Client Applications (If your page looks different, search for Manage OAuth2 Client Applications in the search tool on your homepage).
  1. Click Register Client Application.
  1. Fill out Application Name & Application URL (what actually goes in these fields is not important, except that the URL has to begin with https://). You can also have a look at this guide on how to fill this form.
  2. Run the following command to generate a 2048-bit RSA private key and a Certificate Signing Request (CSR):
openssl req -new -newkey rsa:2048 -nodes -keyout private.pem -out request.csr
  • You will be prompted to enter information such as country, organization, and Common Name (CN).
  1. Use the private key to create a self-signed public certificate valid for 10 years:
openssl req -new -x509 -key private.pem -out cert.pem -days 3650
  1. Open the cert.pem file in a text editor, copy its entire contents (excluding the -----BEGIN CERTIFICATE----- and -----END CERTIFICATE----- lines), and paste it into the X.509 Certificate field in the SuccessFactors form.
  1. Finally, click Register to complete your registration.
  2. You’ve successfully registered your client application for OAuth2 authentication. An API key is generated and assigned to your application. You can view the API key by clicking View on the registered application list.

Step 4: Generating your SAML Assertion

  • You can use a corporate IdP, for example, SAP Identity Authentication Services, or a third-party IdP.
  • You can also use the example code attached to 3031657 to generate SAML Assertion for your application.
  • You can also opt for this simple script prepared by us to generate your SAML Assertion locally.
  1. Now that your certificate is registered with SuccessFactors, you can generate a SAML Assertion using the private key and the certificate you just created from step 3 above. From the same folder where your private.pem and cert.pem files were generated and registered, you can now use the following script to generate the SAML assertion.
  • To generate your SAML assertion, you’ll need to provide the following values:
  • API Key – This is your API Key obtained during application registration.
  • Hostname– Your SuccessFactors API server (e.g., hcm68sales.successfactors.com).
  • Company ID – The company identifier used in your SuccessFactors environment (e.g., SFCPART001523).
  • Username or User ID – Depending on your integration setup, provide either your SuccessFactors username or user ID.
import { readFileSync } from 'fs';
import { dirname } from 'path';
import { fileURLToPath } from 'url';
import { Saml20 } from 'saml';
import crypto from 'crypto';
import readlineSync from 'readline-sync';

const __dirname = dirname(fileURLToPath(import.meta.url));

const getUserInput = () => {
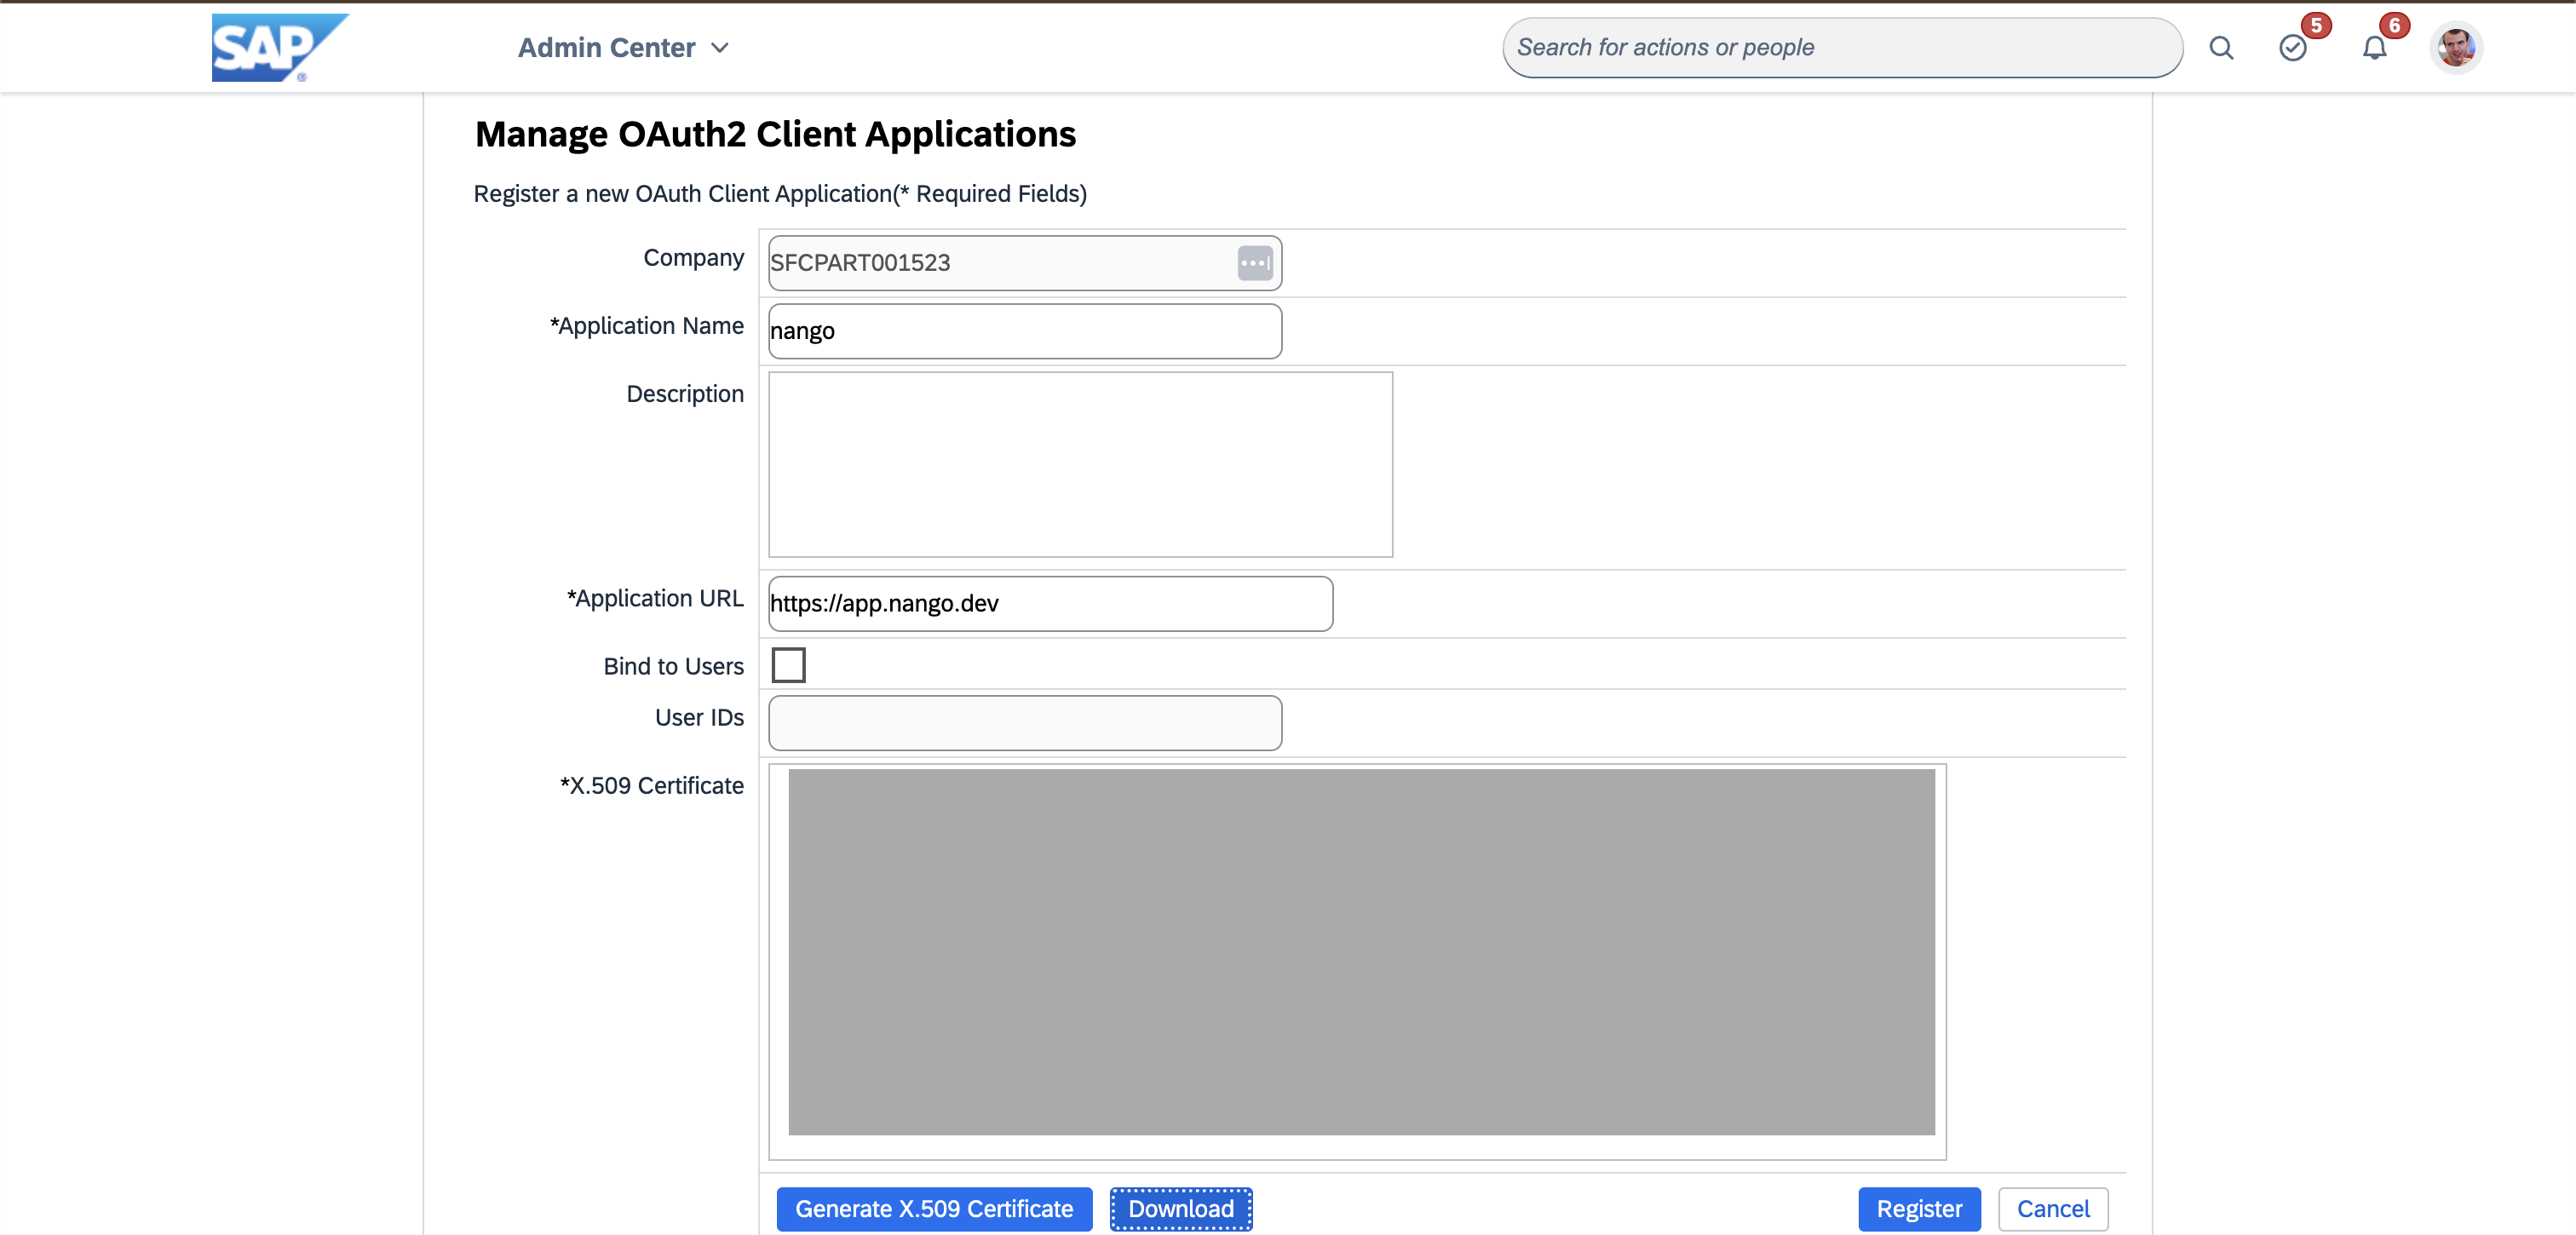
  const clientId = readlineSync.question('Enter your SuccessFactors client ID: ');
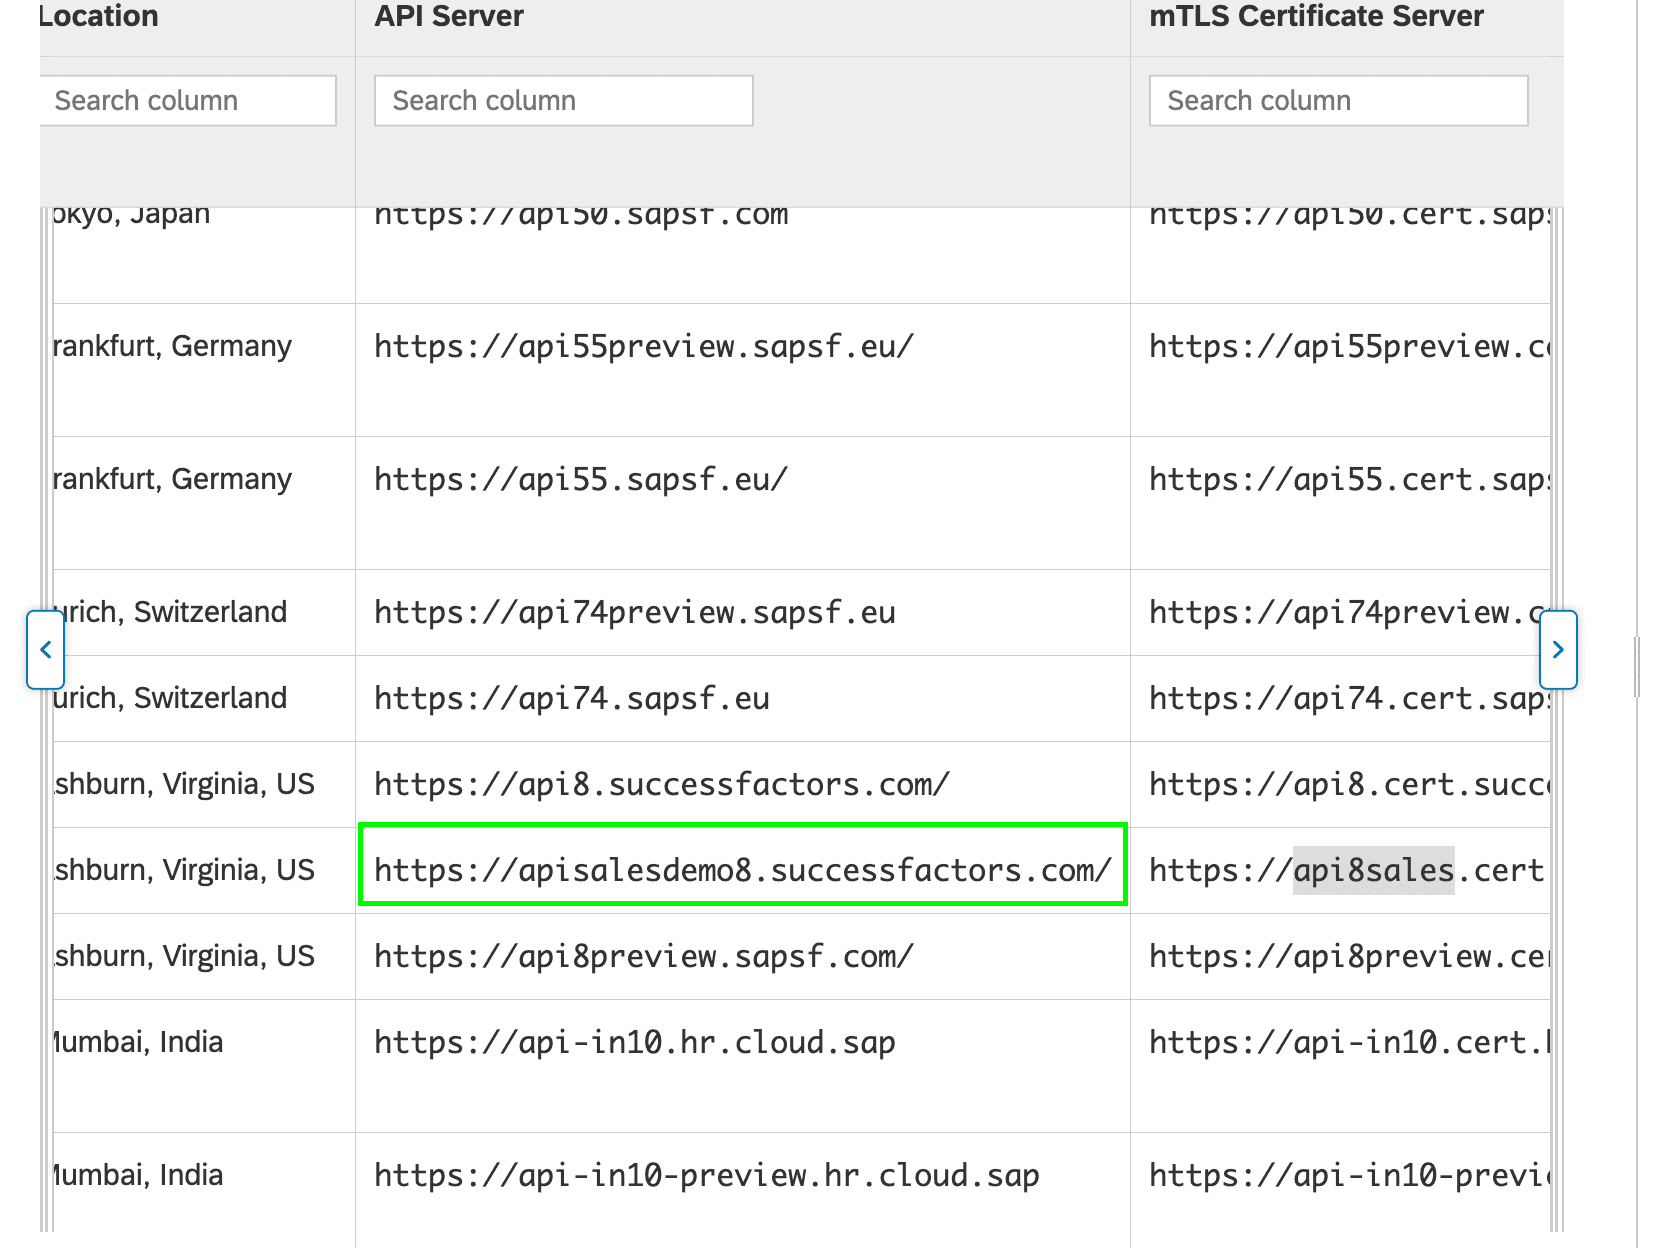
  const hostname = readlineSync.question('Enter your SuccessFactors hostname (e.g., hcm68sales.successfactors.com): ');
  const companyId = readlineSync.question('Enter your company ID (e.g., SFCPART001523): ');
  
  const username = readlineSync.question('Enter your SuccessFactors username (leave blank to use userId): ');
  let userId = '';
  if (!username) {
    userId = readlineSync.question('Enter your SuccessFactors userId: ');
  }

  return {
    clientId,
    hostname,
    companyId,
    username,
    userId
  };
};

const readCertificateFiles = () => {
  try {
    return {
      cert: readFileSync(`cert.pem`, 'utf8'),
      privateKey: readFileSync(`private.pem`, 'utf8')
    };
  } catch (error) {
    console.error('Error reading certificate files:', error.message);
    console.log('Please ensure both public.pem and private.pem exist');
    process.exit(1);
  }
};

const createSamlOptions = (config, certData) => {
  const isUsingUsername = !!config.username;

  return {
    cert: certData.cert,
    key: certData.privateKey,
    issuer: 'www.successfactors.com',
    lifetimeInSeconds: 315360000,
    audiences: 'www.successfactors.com',
    attributes: {
      api_key: config.clientId,
      use_username: isUsingUsername ? 'true' : 'false',
      use_email: 'false',
      external_user: 'false',
      ...(isUsingUsername ? {} : { user_id: config.userId })
    },
    nameIdentifier: config.username,
    sessionIndex: crypto.randomUUID(),
    recipient: `https://${config.hostname}/oauth/token`
  };
};

const generateSamlAssertion = () => {
  const config = getUserInput();
  const certData = readCertificateFiles();
  const options = createSamlOptions(config, certData);

  const rawAssertion = Saml20.create(options);
  const assertion = Buffer.from(rawAssertion).toString('base64');

  console.log('\n✅ SAML client assertion');
  console.log(assertion);
};

generateSamlAssertion();
  • Run the script from the same folder where your certificate files are located, and provide the required details as described above. A SAML Assertion will then be generated.

Step 5: Enter credentials in the Connect UI

Once you have both the above keys:

  1. Open the form where you need to authenticate with SAP SuccessFactors.
  2. Enter the API Server, Company ID, API Key and SAML Assertion in their designated fields.
  3. Submit the form, and you should be successfully authenticated.

You are now connected to SAP SuccessFactors.