Overview
Pre-built tooling
✅ Authorization
✅ Authorization
✅ Read & write data
✅ Read & write data
| Tools | Status |
|---|---|
| Pre-built integrations | ✅ |
| API unification | ✅ |
| 2-way sync | ✅ |
| Webhooks from Nango on data modifications | ✅ |
| Real-time webhooks from 3rd-party API | 🚫 (time to contribute: <48h) |
| Proxy requests | ✅ |
✅ Observability & data quality
✅ Observability & data quality
| Tools | Status |
|---|---|
| HTTP request logging | ✅ |
| End-to-type type safety | ✅ |
| Data runtime validation | ✅ |
| OpenTelemetry export | ✅ |
| Slack alerts on errors | ✅ |
| Integration status API | ✅ |
✅ Customization
✅ Customization
| Tools | Status |
|---|---|
| Create or customize use-cases | ✅ |
| Pre-configured pagination | 🚫 (time to contribute: <48h) |
| Pre-configured rate-limit handling | 🚫 (time to contribute: <48h) |
| Per-customer configurations | ✅ |
Pre-built integrations
Bills
Bills
Credit Notes
Credit Notes
Customers
Customers
Fields
Fields
| Endpoint | Description | Readme |
|---|---|---|
GET /fetch-fields | Fetches all fields in Netsuite | 🔗 |
Invoices
Invoices
Payments
Payments
Purchase Orders
Purchase Orders
Not seeing the integration you need? Build your own independently.
Access requirements
| Pre-Requisites | Status | Comment |
|---|---|---|
| Paid dev account | ❓ | |
| Paid test account | ❓ | |
| Partnership | ❓ | |
| App review | ❓ | |
| Security audit | ❓ |
Setup guide
No setup guide yet.Need help getting started? Get help in the community.
Contribute improvements to the setup guide by editing this page
Useful links
- How to register an Application
- OAuth-related docs
- Scopes (
restlets,rest_webservicesand/orsuite_analytics) - API endpoints
Contribute useful links by editing this page
Connection configuration in Nango
- Netsuite requires a user specific account id to run OAuth.
API gotchas
- There doesn’t seem to be a way to create a Netsuite account without scheduling a call.
- The
netsuiteintegration which uses OAuth 2.0 has a refresh token that has a fixed expiration of 7 days. After which point the refresh token becomes invalid and a new access token must be obtained by making users go through the authorization code flow again. To avoid this we recommend using the machine to machine flow which is called thenetsuite-tbaintegration in Nango
Contribute API gotchas by editing this page
Admin Setup for netsuite-tba
- Ensure you have admin privileges and login to your Netsuite account and navigate to Setup > Company > Enable Features
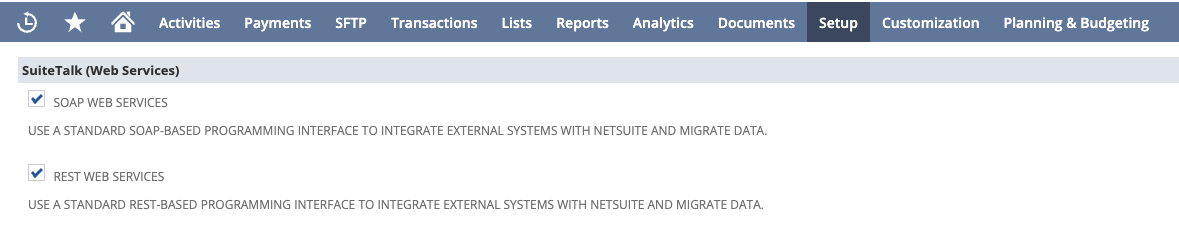
- Under the “SuiteTalk” header make sure the SOAP WEB SERVICES and REST WEB SERVICES checkboxes are checked
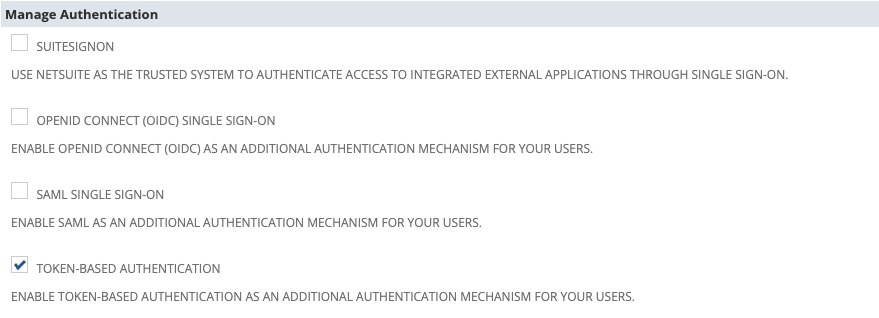
- Under the “Manage Authentication” header make sure the TOKEN-BASED AUTHENTICATION checkbox is checked
- Click the save button
- Navigate to Setup > Integration > Manage Integrations > New
- Set the desired name of this integration
- Enable TOKEN-BASED AUTHENTICATION and disable TBA: AUTHORIZATION FLOW and AUTHORIZATION CODE GRANT
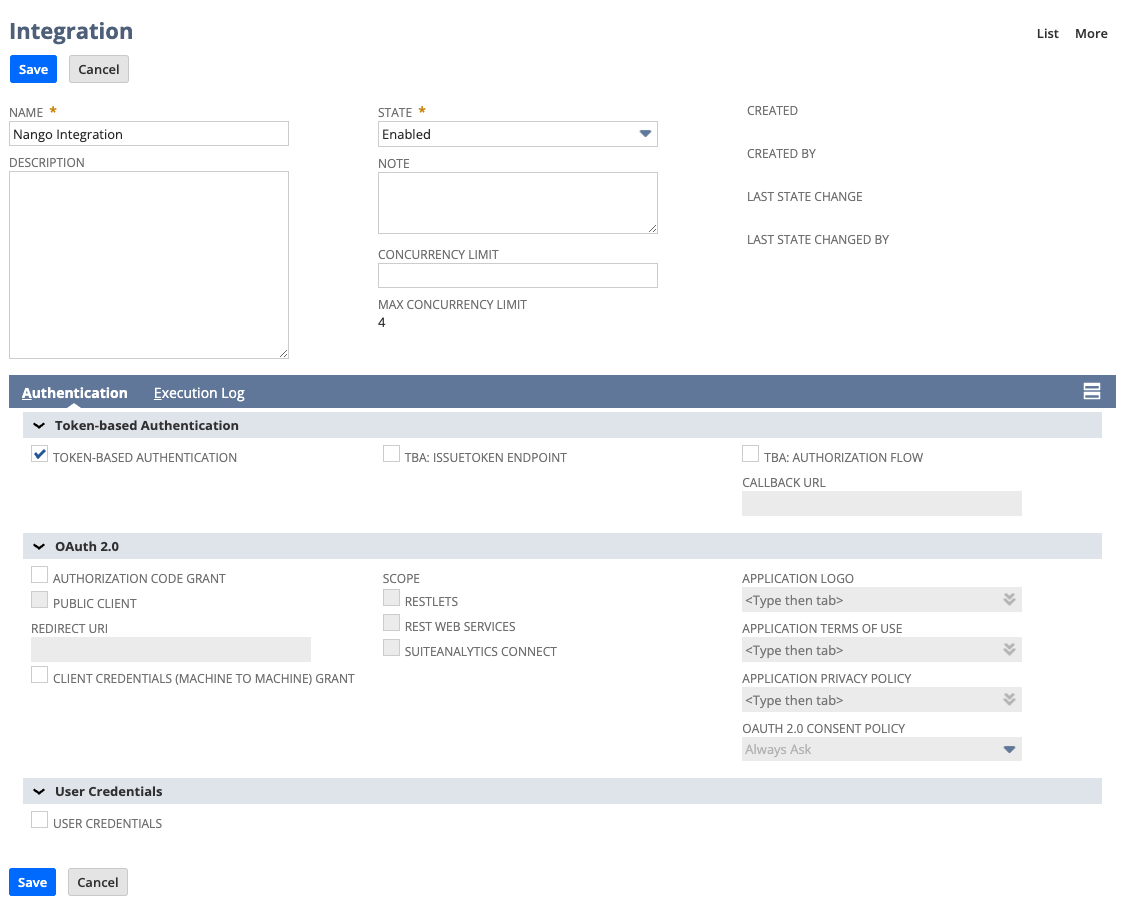
- Click the save button
- The client credentials will now be displayed and be sure to copy the Consumer Key, Client ID, Consumer Secret, and Client Secret
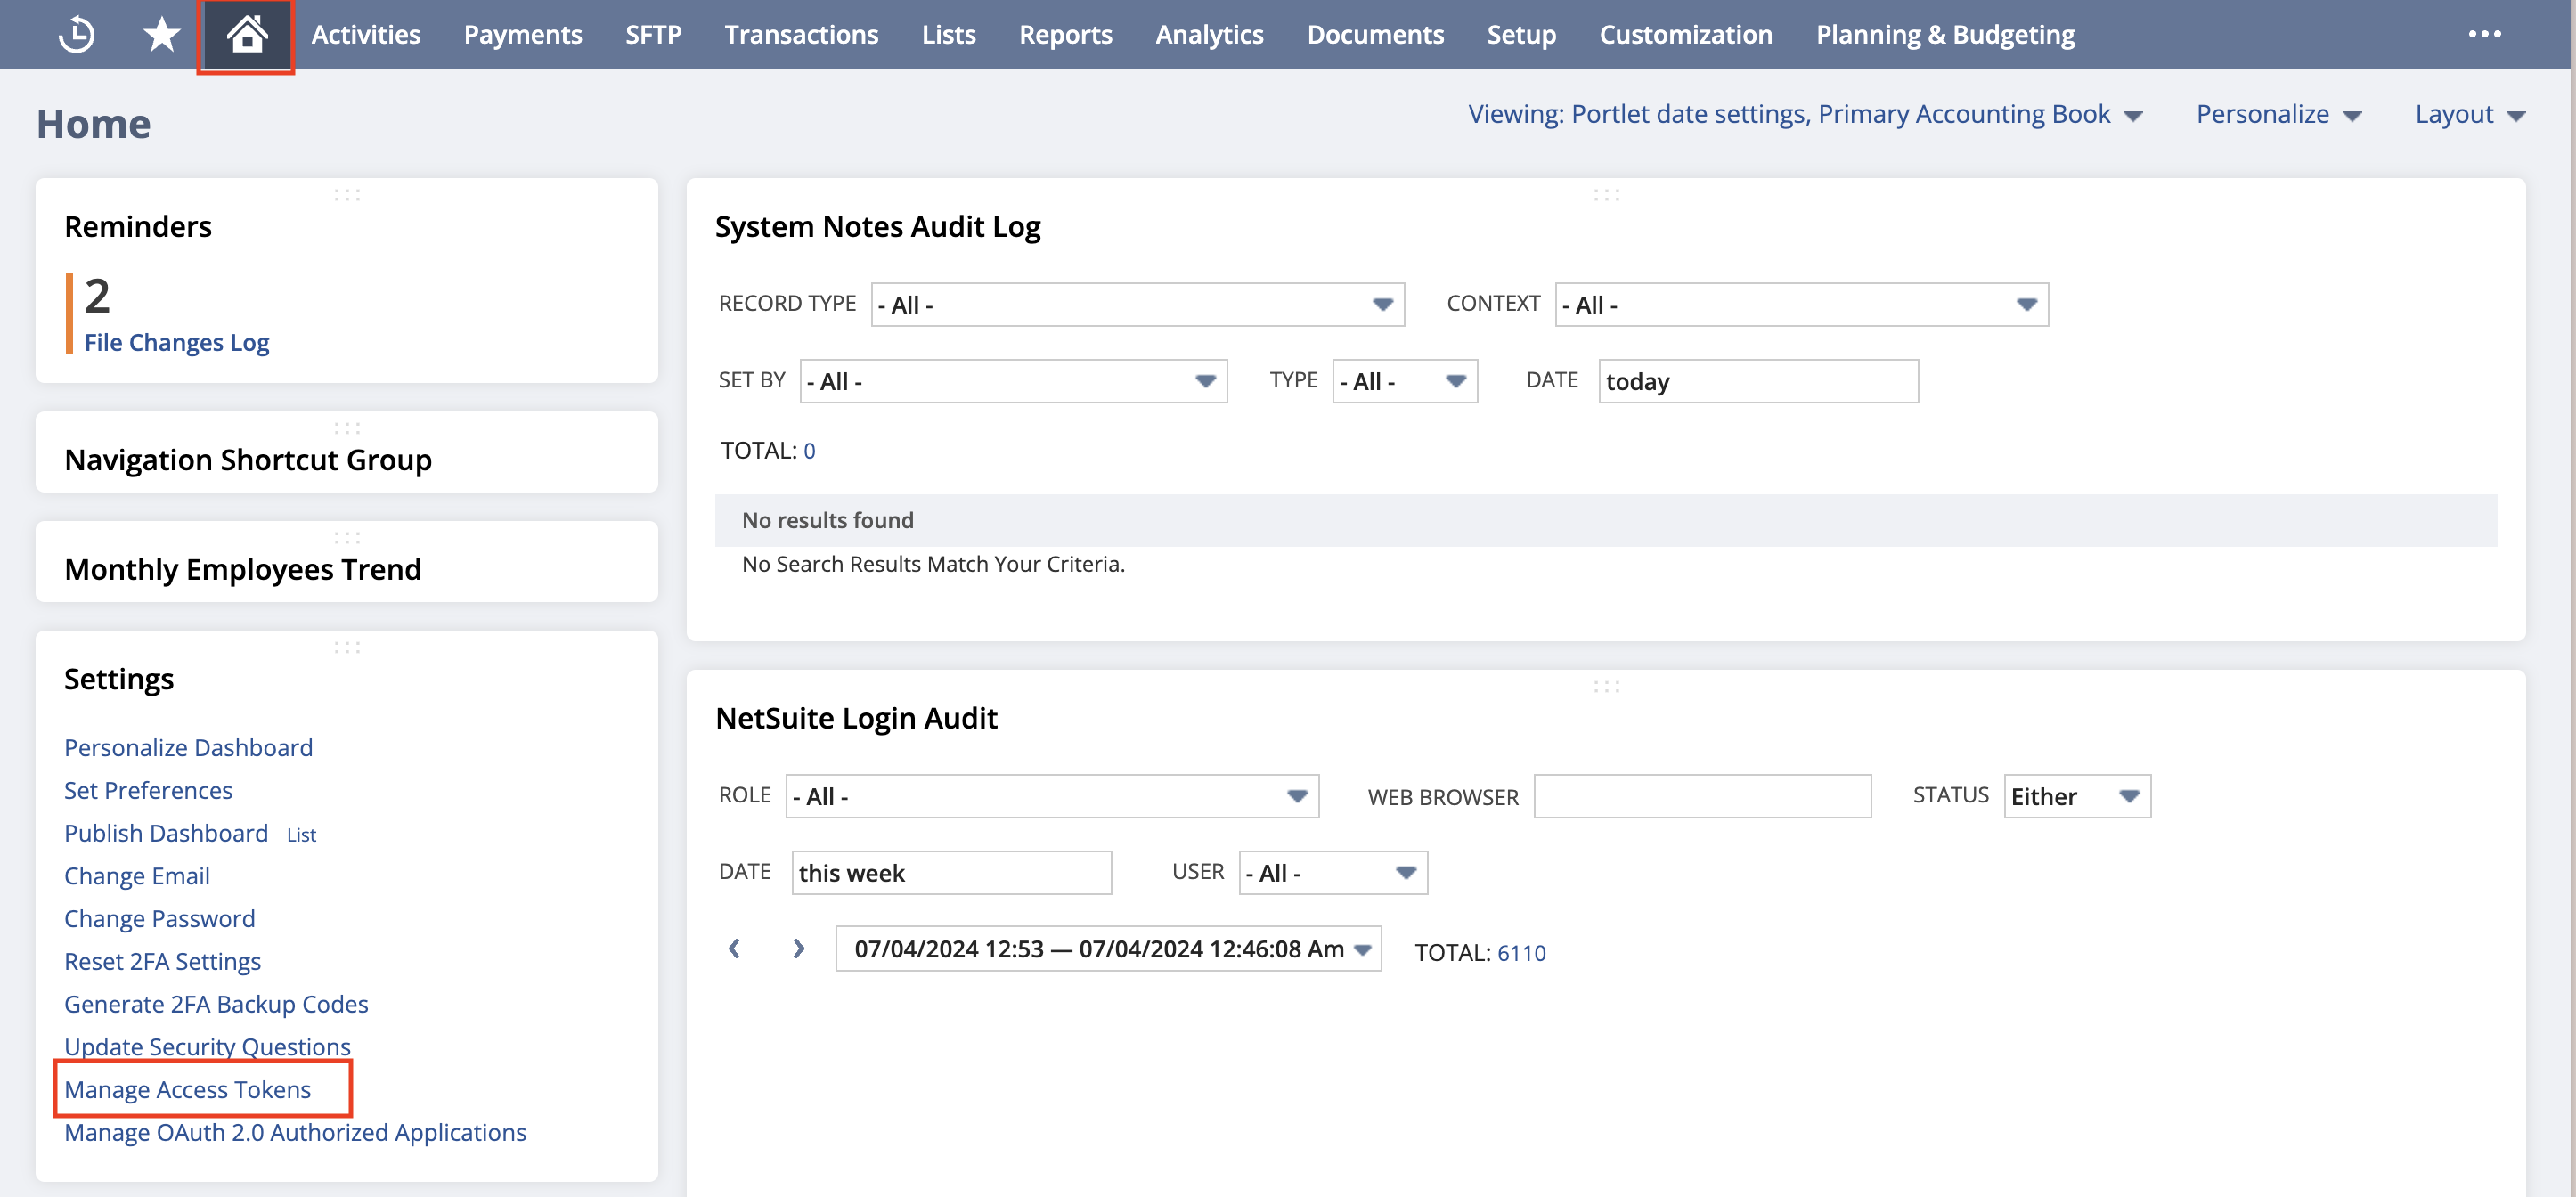
- Navigate to the homepage by clicking the home icon
- At the button left corner click the Manage Access Tokens button
- Select the Application Name you created for this integration
- Enter a “Token Name”
- Save your new access token
- The token credentials will now be displayed. Copy the “Token ID” & “Token Secret”
- In Nango create a new integration using the
netsuite-tbaand leave the “Client Id” and “Client Secret” values empty. - Create a new connection and for the “OAuth Client Id Override” value paste in the value you received from Netsuite called “Client ID” and for the “OAuth Client Secret” value paste in the value you received from Netsuite called “Client Secret”. For “Token ID” & “Token Secret” paste in the values you received from Netsuite from the access token step. The account ID value can be found from your Netsuite URL instance
Non-Admin Role Setup for netsuite-tba
When setting up Netsuite TBA with a non-admin role, additional configuration is required. This section covers the necessary permissions and setup steps for non-administrator users.
Required Role Permissions
The role must have the following permissions enabled under Setup > Users/Roles > Manage Roles > [Your Role] > Permissions: Under “Setup”:- SOAP Web Services permission
- REST Web Services permission
- Token-Based Authentication permission
- OAuth 2.0 permission (recommended for future flexibility)
Creating Access Tokens with Specific Roles
To create an access token for a non-admin role:- Switch to the desired role using the role selector in the top-right corner
- Navigate to Setup > Integration > Manage Access Tokens
- Click “New Access Token”
- Select your application from the dropdown
- Provide a token name
- Save and securely store the Token ID and Token Secret that are displayed
The role selection at token creation time determines the permissions available to that token. Make sure you’re using the correct role before creating the token.
Required Permissions for Token Management
Users who will be creating integrations and tokens need these additional permissions: Under “Setup”:- Access Token Management permission
- Integration Application permission
- Manage Integration permission
Additional Configuration Considerations
Concurrent Web Services User
If you need to make concurrent API calls:- Navigate to Setup > Company > Enable Features > SuiteCloud tab
- Enable “CONCURRENT USERS FOR WEB SERVICES”
- For each user that needs this capability:
- Go to Setup > Users/Roles > Manage Users
- Edit the user
- Check “Web Services User”
- Check “Concurrent Web Services User”
The “Concurrent Web Services User” setting may require an additional user license. Consult your Netsuite account representative for details.
Troubleshooting Non-Admin Access
If you encounter authentication issues:-
Permission Verification:
- Log out and log back in after permission changes
- Verify permissions are saved by checking the role again
- Ensure all parent permissions are also enabled (some permissions have dependencies)
-
Role Configuration:
- Confirm the user is assigned the correct role
- Verify the role has all required permissions listed above
- Check if the role has access to the necessary records and features
For detailed permission setup, refer to the Netsuite Token-Based Authentication Setup Guide.